
In this tutorial, we will learn how to upload your flutter project to Github. This will be step by step guide aimed at beginner but it can be used by anyone. I will be explaining by uploading Flutter project but you can use this method to upload any project or directory.
I will be using the InstaJoke project that I have created in the post titled Learn HTTP Request in Flutter with API call to be uploaded.
We will be using the Git version control system and the GitHub to store our code. If you follow opensource community or have searched for any opensource application then you have come across GitHub. It is one of the code-heaven for developers. You can upload your projects to the platform to share it with the world and it also is a great way to showcase your skill. To upload the code we will be using Git which is also an opensource tool for version control.
Let us get Started!!!
Getting Started
To get started and upload your flutter project to GitHub we will need some software to be installed in your PC. If you already have done this you can skip to next section.
You will need to have following ready:
- Git (You can get the software from https://git-scm.com/)
- GitHub Account (You can create an account for free at https://github.com/ )
- Flutter Project or any directory
In this tutorial, I will be explaining only way to upload the flutter project or any directory to GitHub. Installing Git, creating GitHub account and configuring Git is out of the scope of this tutorial. If you would like to know, please let me know in the comments, I will surely make a tutorial.
Preparing Flutter Project Directory
Now let us prepare our local project directory first. For this purpose open your terminal or CMD for windows and go to your project directory.
cd /path-to-project/InstaJoke/
Once you are inside the project directory, we will create empty git repository or reinitialize existing one.
git init
Once the repository is initialized we will now add all the files in the current folder.
git add .
Notice the (dot) after add command? That will add everything from current directory, all files and sub folders.
At this moment I will like to mention about .gitignore file. This file will be auto-generated when you create the Flutter project. If you check the content of this file, it will have many files and path to the directory.
What exactly does .gitignore file do?
Any file or folder listed in the .gitignore file will not be added to our GitHub repository. Meaning it will be ignored. This is very important if you are sharing your source code to the public. For example, you might have a new file with some credentials. You do not want to upload this file to GitHub, just add the file to .gitignore file and it will not be added.
OK, we have now added the file, next we will commit. While committing the changes, we will specify message. So with this message we can understand what we had done with this particular commit.
git commit -m "This is First Commit"
As this will be our first commit, so with the message I can understand it. For this, it might take some time if you have a huge number of files.
Before we use the terminal further, let us create repository on GitHub first.
Creating a GitHub Repository
To create a new repository on GitHub, you need to visit https://github.com/ and log in to your account.
Next click on the Plus (+) symbol on top right corner of the page and click “New Repository”.

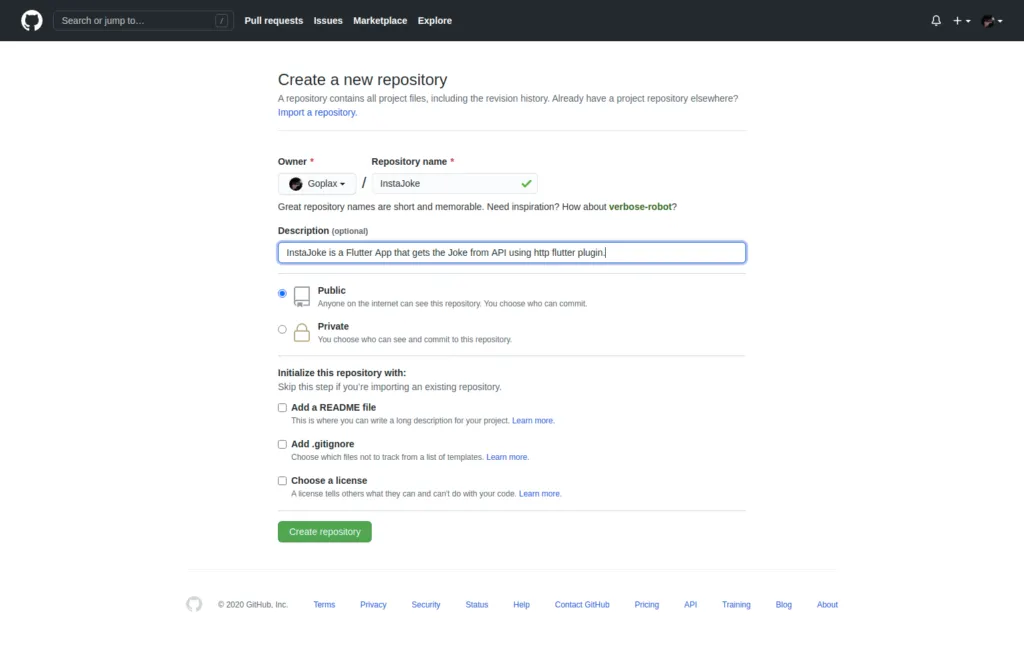
Now on the new page enter the details.
- We will name this repository as “InstaJoke”. Note: This name can be different from the project name on your PC.
- Entering Description is optional
- If you do not want the public to view your project, select Private. Else keep it as public.
If you are good with details entered, click “Create repository” button.
Once the new repository is successfully created, you will see a new page. If you go through this new page, you will see instructions of how to add codes to the repository.
Keep note of the git URL. It should look something like https://github.com/Goplax/InstaJoke.git

Now we are done with creating a repository on GitHub. Next, we will proceed to add our code to this repository from our local folder.
Uploading the Flutter Project
Now let us come back to our terminal. We will now connect our local repository with the remote repository.
git remote add origin <https://github.com/Goplax/InstaJoke.git>
Once the above command runs successfully. We will now upload all our files.
git push -u origin master
Here we will be pushing all our files to the branch “master”. If you are having different branch, please mention the name of that branch. This might take some time based on your file size and internet bandwidth.
You will see summary of this upload. It will be something like below:
Enumerating objects: 91, done.
Counting objects: 100% (91/91), done.
Delta compression using up to 4 threads
Compressing objects: 100% (72/72), done.
Writing objects: 100% (91/91), 53.41 KiB | 2.32 MiB/s, done.
Total 91 (delta 3), reused 0 (delta 0)
remote: Resolving deltas: 100% (3/3), done.
To <https://github.com/Goplax/InstaJoke.git>
 * [new branch]      master -> master
Branch 'master' set up to track remote branch 'master' from 'origin'.
Now you are done.
To check if all went good, open the link to your code in GitHub website and you should be able to see the files there. For this project following is the link:
https://github.com/Goplax/InstaJoke
Updating the file and uploading changes to GitHub
In the above step, we have seen how to create, initialize and upload your codes to GitHub using Git. Most of the time, that is not the end of it. You will need to make changes in your project and upload the updated file to the GitHub repository.
In this section we will see how to do that. First make some changes to the file first. For me I am updating my README.md file.
Once you have made all the changes. Type below command:
git status
This command will show the files modified by you. It will be something like below:
On branch master
Your branch is up to date with 'origin/master'.

Changes not staged for commit:
  (use "git add <file>..." to update what will be committed)
  (use "git restore <file>..." to discard changes in working directory)
	modified:   README.md

no changes added to commit (use "git add" and/or "git commit -a")
Next we need to add these changes.
git add .
This will add all the files that you have changed. Next we will commit this change.
git commit -m "Readme file update with a link to the tutorial"
You will see the summary of this commit as shown below:
[master f35da44] Readme file update with a link to the tutorial
 1 file changed, 7 insertions(+), 16 deletions(-)
 rewrite README.md (97%)
We have committed our changes. Now we will first pull the data and then push the changes. We are pulling first to make sure that our repository is up to date. This is handy if you are making changes after a long time and not sure if your repository is up to date or also when you are working in a team.
git pull
git push
Once upload is done, the summary of the upload will be displayed to you.
Now you can visit your GitHub repository page and check, the new update should be there.
Conclusion
I hope you have followed this step by step tutorial to upload your flutter project in GitHub till the end. With that, you have learned everything from basic and is now confident. If you had faced some issue and came to find tips on the particular portion, well I am glad that I could help you.
Had you faced any difficulties on any part of the tutorial, mention in the comment section. I would be glad to help you through.